How to Remove and Replace a Toro Lawn Mower Blade

Blades are precisely the component that gives a straight-line result. If the appearance of your lawn is important to you, then the condition of your blades should be just as important. But they can also be a minor headache for the user. Blades are just consumables. There is no need to be overly careful with them or worry about replacing them. When the time comes, it's time. Today, we will talk specifically about how to change Toro lawn mower blade.
Why You Might Need to Replace a Toro Mower Blade
There can be many reasons for replacement, but most often they are related to the course of time. Believe me, you will definitely have to perform Toro blade removal after a couple of years of using your equipment. This will need to be done in the following cases:
-
you have not performed this procedure for three years
-
you have discovered damage to the blade
-
general poor condition of the blade
-
the blade remained dull even after sharpening
-
the grass mowing became uneven
-
the blade does not so much cut as tear out the grass
Experienced lawn mowers have one rule of thumb. If you mow frequently, the blades must be replaced at least once a year. The rule of replacing blades every three years applies more to owners of very small plots. In addition, you should never rule out the possibility that sooner or later you will hit a bump with your blades.
Tools and Safety Precautions
To replace it, you will need the most basic set of tools, which can be found in any corner of your home workshop:
-
Torque wrench or socket
-
Safety gloves
-
Piece of wood
-
Replacement for your Toro blade
Note: Before starting Toro mower blade removal, you must also disconnect the power supply to the machine to ensure that the blade does not start operating during the work. In our specific case, you need to completely remove the spark plug from the equipment.
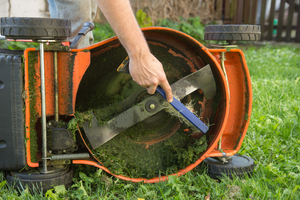
How to Remove a Toro Lawn Mower Blade
Step 1. Removing the old one.
You're just a few steps away from removing Toro mower blade. Let's start by removing itself.
-
Turn the machine on its side so that the air filter and carburetor remain on top.
-
Place a piece of wood between the blade and the deck so that it cannot come into action under any circumstances.
-
Use a torque wrench to unscrew the center bolt.
-
Pay attention to how the blade is positioned before removing it.
-
Remove the bolt, blade adapter, and blade itself.
Step 2. Installing the new one.
-
Install your new blade in the blade adapter bracket and retighten the bolt.
-
Install the new blade in the same direction as the old one and secure your work again with a piece of wood.
-
Tighten the center bolt securely using a socket.
Common Mistakes When Changing Toro Mower Blades
There are two common mistakes that novice users often make. The first one concerns the blade direction. That is why it is important to carefully study the identification marks on the old blade before removing it. The second mistake is related to premature blade replacement. Remember, if there are no obvious signs of wear on the part and the lawn still looks good after mowing, you do not necessarily need to remove Toro mower blade.
Tips for Maintaining Toro Lawn Mower Blades
Regularly checking the condition of your blades should become part of your routine if you are truly demanding when it comes to the condition of your lawn. Experts also recommend sharpening the blades about every 25 hours of operation. Checking the balance is another important procedure on the way to perfectly functioning equipment. You can use a special balancer to check this, but a regular nail will also work. The blade should not tilt to either side.
Where to Buy Tools and Parts You’ll Need
Let's assume that the breakdown is not serious and you are willing to spend some time fixing it. To fix a lawnmower, you will need consumables. The UDC Parts website is ready to become your reliable partner at this stage. We offer a wide range of spares, including:
Identify the problem and order exactly what spares you need in the required quantity. Starting from two units, our customers are eligible for a discount system. And even if you only need one item, you can choose it at the best price. Take advantage of the promotional offers on our website and, if you wish, compare prices with our competitors. Don't forget about our super-fast delivery, which is another advantage of working with our company.
Belts, clutch cables, pulleys, and spindles are exactly the consumables that will come to the rescue in most situations. Compatible with all leading brands of lawn mowers, as well as a wide range of models. Versatile, reliable, high-quality. Use the quick search on the website and find the spare you need for your equipment.
Step-by-Step Lawn Mower Engine Repair
If you are unsure of the cause of the lawn mower malfunction, you can perform a comprehensive inspection, which is best done in half a working day. During this time, you will be able to diagnose, prevent, and actually repair the malfunction yourself. In general, it is worth performing this general procedure at least once a year. Then the question of repairing a lawn mower will not arise in the first place.
Step 1. Workspace, necessary tools, and spares.
The first step is fundamental in lawn mower engine repair. Prepare your equipment for work by first disconnecting it from the power supply. The most reliable way to do this is to remove the spark plug. Prepare protective gloves and goggles. They will protect you against external factors. After all, you did not design the lawn mower and cannot know all the details of its construction.
You should already have a complete set of tools on your table. In fact, it is not large and is a basic set for any homeowner. Among other things, you will need:
-
socket wrench
-
screw drivers
-
carburetor cleaner
The higher level is when you always have a couple of spares in stock that solve the most common problems. These include:
-
mower belts
-
clutch cables
-
tension springs
-
pulleys
-
spindles
This preparation will enable you to deal with nearly any problem, except for the most critical ones.
Step 2. Remove dirt, disassemble the equipment, examine the damage.
You must carefully inspect your equipment, and nothing should prevent you from doing so. Clean the components of any grass clippings or dirt. Using the instructions and your technical experience, disassemble the lawn mower into its components for a more detailed inspection. Your overall task is to examine the condition of all replaceable consumables, as well as the condition of the engine.
Step 3. Examine the main components in more detail.
-
Defective spark plug. Since you have already removed the spark plug, carefully examine it for damage or wear. Replace it if you have any concerns about its condition. Due to a weakened electrode, this part generally requires regular replacement (approximately once a year). You can also use a special ignition tester. This device will help you determine whether there are any malfunctions in your spark plug and whether it is producing a spark.
-
Restricted carburetor. Carburetor problems are not uncommon. They can arise, in particular, from old fuel that has been left in the tank. In fact, dried fuel is one of the most common reasons why people visit service centers, when their lawn mower refuses to start.
Please be careful. If possible, drain old fuel at the end of the season, and during the season, use only fresh fuel and add stabilizers to it to preserve its quality.
You can also clean the carburetor yourself using specialized tools and remove any possible clogs. There are also special repairing kits. With them, you can replace one or another carburetor part. In severe cases, the entire carburetor must be replaced.
-
Clogged fuel filter. Poor fuel quality can affect the performance of another component. The fuel filter can easily become clogged. You can try to clean it using long, thin objects or replace the entire component again.
-
Malfunctioning ignition coil. The malfunction of this part can be easily checked with the ignition tester mentioned in the point 1 above. It is the ignition coil that sends voltage to the spark plug while the engine is running, so we are talking about an extremely important part.
-
Broken flywheel key. An important, small metal part that stops the engine when the lawn mower hits a solid obstacle. It becomes unusable and must be replaced immediately. It is located in a special groove in the crankshaft.
-
Defective recoil starter. This part is the link between the rope and the pulley. The rope part will simply stop winding onto the pulley. The result: the machine will not start again. Depending on your model, replace individual parts or the entire system.
-
Worn or damaged belts. Refer to the instructions for your lawn mower. Loosen the tension on the belts and remove them. Carefully pull the new consumables around the pulleys. The original instructions also include the tension force with which these procedures should be performed.
The above are fairly common cases and causes. Thousands of lawn mower owners around the world encounter them every day. In addition to these basic malfunctions, rarer ones may also occur.
Step 4. Less common problems (you can still handle these yourself)
-
Fuel tank troubleshooting. Another small component may prevent the engine from starting: the fuel tank cap vent. Tighten it securely and try starting the engine again. You can also try cleaning the vent with a thin wire. Lightly clean the tank filter if you feel that the fuel flow is weak. Is it still slow? Clean the fuel line with a pipe brush.
-
Intake and Exhaust Valves. Valves are an important component of any type of engine. To keep them in good condition, you need to change the oil regularly. They must also always be kept perfectly clean. You can clean them using either improvised means or special solutions. Valves should have a smooth appearance. If there are even the slightest scratches or oil stains on them, any specialist will recommend immediate replacement.
Valve heads can also break off, resulting in improper fuel injection and reduced combustion efficiency. Again, if the valves are badly chipped, you will need to buy new ones. To remove the valves, you need to compress the compression springs and remove the valve spring retainer. Now, it may take a little effort to reassemble the valve parts.
-
Spark Arrestor. This is a spare part that rarely causes any problems due to its simple design. As its name suggests, it is meant to catch any sparks that could theoretically fly out of your equipment. In practice, as you understand, this happens quite rarely. If you do manage to get to it in the depths of the lawn mower, you can assess the level of contamination and, if necessary, clean it with a metal brush.
When to Call a Professional
In any case where you realize that you are more likely to damage your equipment than repair it — especially if you're unsure how to repair a lawn mower — it's best to step back. This includes any type of work on the engine itself, as well as on small parts such as pistons. For example, just to get to this piston part and examine it closely, you will literally have to take the engine apart from top to bottom.
Leave lawn mower engine problems to the professionals. They not only have the necessary knowledge, but also the equipment to work safely. The cost of repairs often ranges from $75 to $550, which is a small price to pay for the opportunity to enjoy a perfect lawn all year round. But to keep this figure from increasing year after year, all preventive maintenance and replacement of spares should be done by you.
Why Choose UDC Parts for Your Lawn Mower Repairs
At UDC Parts, we value your time and convenience above all else. Our quick search feature will help you find and order the part you need in just a minute. And within three days, it will be waiting for you at your doorstep. Three-day delivery is available throughout the United States. We also strive to keep our prices competitive so that you can appreciate our value in this regard as well. When you step into lawnmower engine repair with UDC Parts, you can be sure of confident customer service and the excellent quality of our aftermarket consumables.